Contents
- Preface
- Buying Portal
- Labels & Tags
- Dymo Labels
- Import Portal Information to Square Point of Sale (POS)
- Entering or Importing Customer Reference # and Contact Information and to Square or Square for Retail
- Import Transaction Information (Items_###.csv file) into Square or into Square for Retail and Update related Customer record.
- Manage Consignor and Seller Payments
- 1) Determine the $ sales of consigned items during a consignment period and calculate the corresponding payments owed consignors
- Determine the $ sales of consigned Items during a consignment period by Category # (Customer Reference ID #)
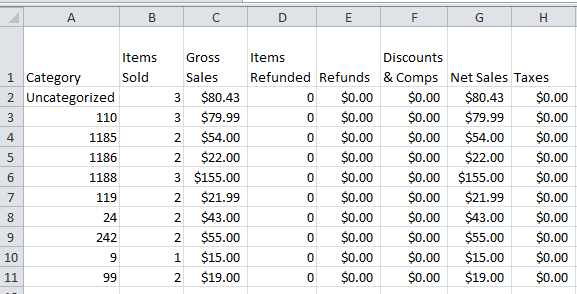
- [Export] the Category Sales Report. The resulting Excel File will look like this.
- Calculate the amounts earned by customer reference #s within the consigning for cash and consigning for Store Credit groups.
- 2) Record related cash payments and store credit obligations to Consignors
- 4) Register the use of Store Credit by Consignors and Sellers
- 1) Determine the $ sales of consigned items during a consignment period and calculate the corresponding payments owed consignors
- Manage Consignor and Seller Inventory
Preface
The NextGen Buying Portal in combination with the NextGen Pricing Tools and either the Square Point of Sale (POS) system or Square for Retail POS System provide a comprehensive system for consignment and resale businesses to buy, price, sell and manage inventory and to manage seller, consignor and customer accounts.
The NextGen Buying Portal manages the entry of Customer Contact and Transaction information covering the buying or consigning of items for resale, and exports this information for import to the Square and Square for Retail (POS) Systems* to manage seller/consignor payments and Sales, and/or into Dymo for tag/label printing. YES, the NextGen Portal, Square POS and Dymo System may be used for Consignment as well as for Buy-outright operations and this Help Guide explains how.
This Help Guide covers:
- the operation of the NextGen Buying Portal,
- the export of information from the NextGen Portal and import to the Square or Square for Retail POS System,
- the setup and printing of tags directly in Dymo.
Note: Printing with Zebra or other Printers can be done as part of the Square for Retail POS system. Related instructions may be found as part of that POS System. - the features of Square and Square for Retail integral to their use by consignment and resale businesses.
IMPORTANT: The Guide does describe the import of consigned items and management of consignment sales and consignor payments in Square. However, NextGen suggests importing into Square only those items that have been accepted on consignment as the sale of these items must be tracked for consignor payment. Tracking the sale of items bought outright is unnecessary and unnecessarily time consuming in the Square POS, as unlike Square for Retail, it does not support the use of barcodes. Items bought outright may simply be tagged for display and sale. At checkout, each item is assigned one of a small number of pre-defined categories by which the owner/manager wishes to report sales (using Square’s very robust reporting engine), and the price showing on the tag is entered.
The Guide does not cover the Portal’s configuration and setup, which is managed by NextGen in collaboration with the store owner(s) or designee(s). A companion Guide on smart buying & pricing practices for Women’s items is available for download/printing from the Store Admin Screen
This Guide includes a detailed table of contents corresponding to the Portal menus, screens, and pricing variants. A click on the Topic of interest, transports the user to that section of the Guide.
Buying Portal
Enter portal.nextgenhelp.net/login to call up the Login Page.
Log in to access your Store’s Pricing Portal.
The store owner and other users authorized by the owner may log in to the Store’s pricing portal by entering the Admin ID or User ID and password. The Admin & User ID’s are made known to the owner at the time the account is setup.
There are three sets of functions in a Portal Account . The [Store Admin] functions involve the adding of Brands and Categories. The [Customers] functions involve adding, editing and deleting Customer information. The [Transactions] functions provide for the entering, viewing, editing, pricing, and printing of items bought outright or accepted for consignment.
The [Help Women] & [Help Children] buttons may be found in the top bar of any screen.
Note: This same Guide on ‘how to the use of the Portal,’ appears with either selection as the Children’s and Women’s Guides are now combined and have grown to include “Men” and “Furniture”(Home Furnishings). Selecting [Logout] in the top bar of any screen may be selected to exit the Portal.
Store Admin Screen
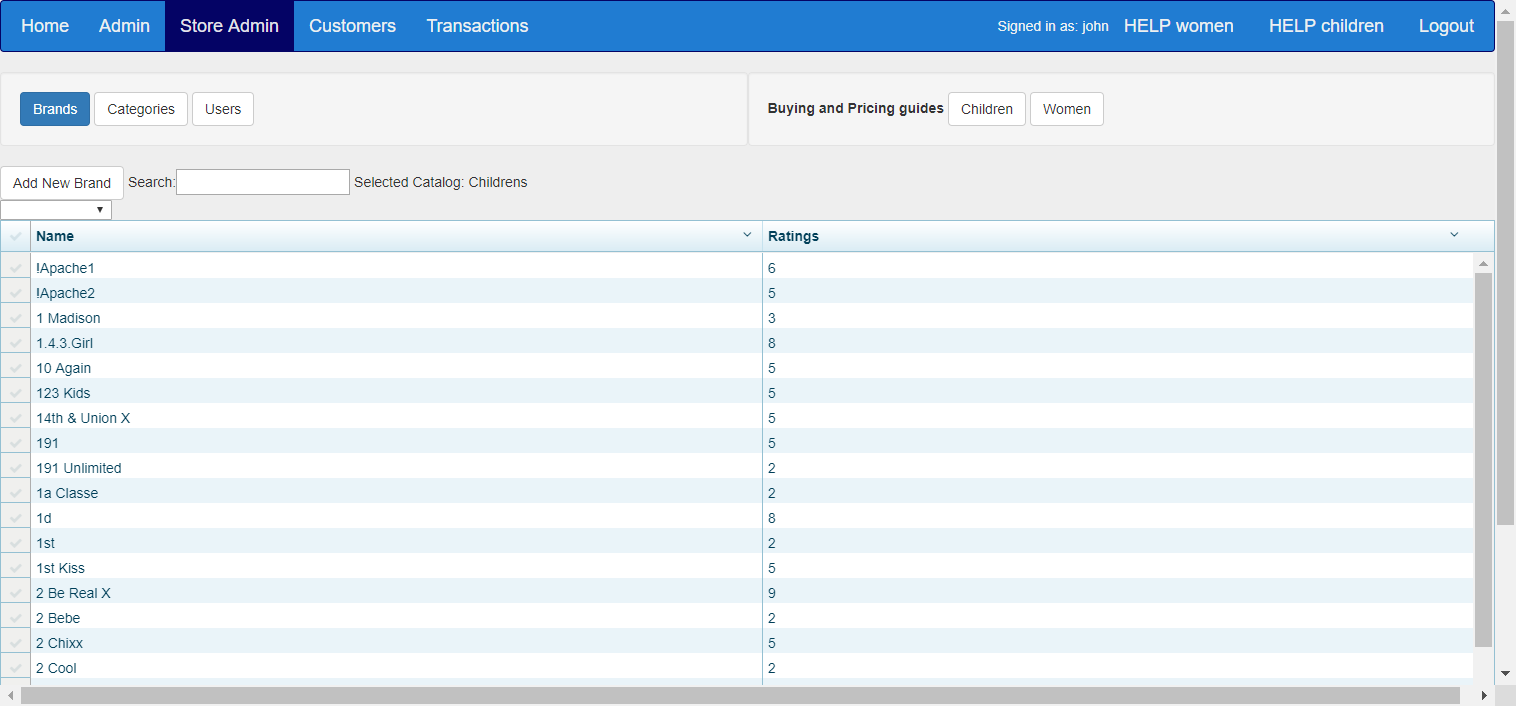
The Store Admin Screen is accessible only to person(s) with the user name “Admin_##”. It allows the Store Admin to Add New Brands and to Add New Categories with Pricing. Suggested prices by category for the brands added will generally be available the next day.
Categories
NOTE: A list of all categories may be viewed, saved or printed from the transactions screen , Enter Categories Women or Categories Men in the Category field and press the [Checkit] button.
To view a specific Category, enter the Category name in the Search field.
[Add New Category] This functionality will be introduced as part of the coming PriceIt app in 2021.
Brands
Click on [Brands] to view existing brands.
To view a specific brand, start entering the brand name in the Search field until it appears.
There are nine (9) brand levels (price levels) for each category, from the highest valued (A1) to the lowest valued (C3). As a rule, levels C1, C2 & C3 include lesser brands found in discount department stores & superstores online and off, local shopping centers & strip malls, levels B1, B2, & B3 include brands typically found in better department stores and shopping malls , levels A2 & A3, include high-end brands found in top department stores and boutique shops. Level A1 includes mostly designer brands along with a small number of non-designer brands with prices ranging beyond any one of the other 8 NextGen suggested price levels. Unlike the “max”, “mid” and “min” prices suggested for an item at levels A2-C3, the “MAX”, “MID”, & “MIN” prices at level A1 display in ALL CAPS and the suggested price range will be found to be too wide to be of practical use. Users are strongly encouraged to use the “CHECKIT” function, NextGen’s item-specific on-line price utility [later explained] to better assure the “right” price for level-1 items.
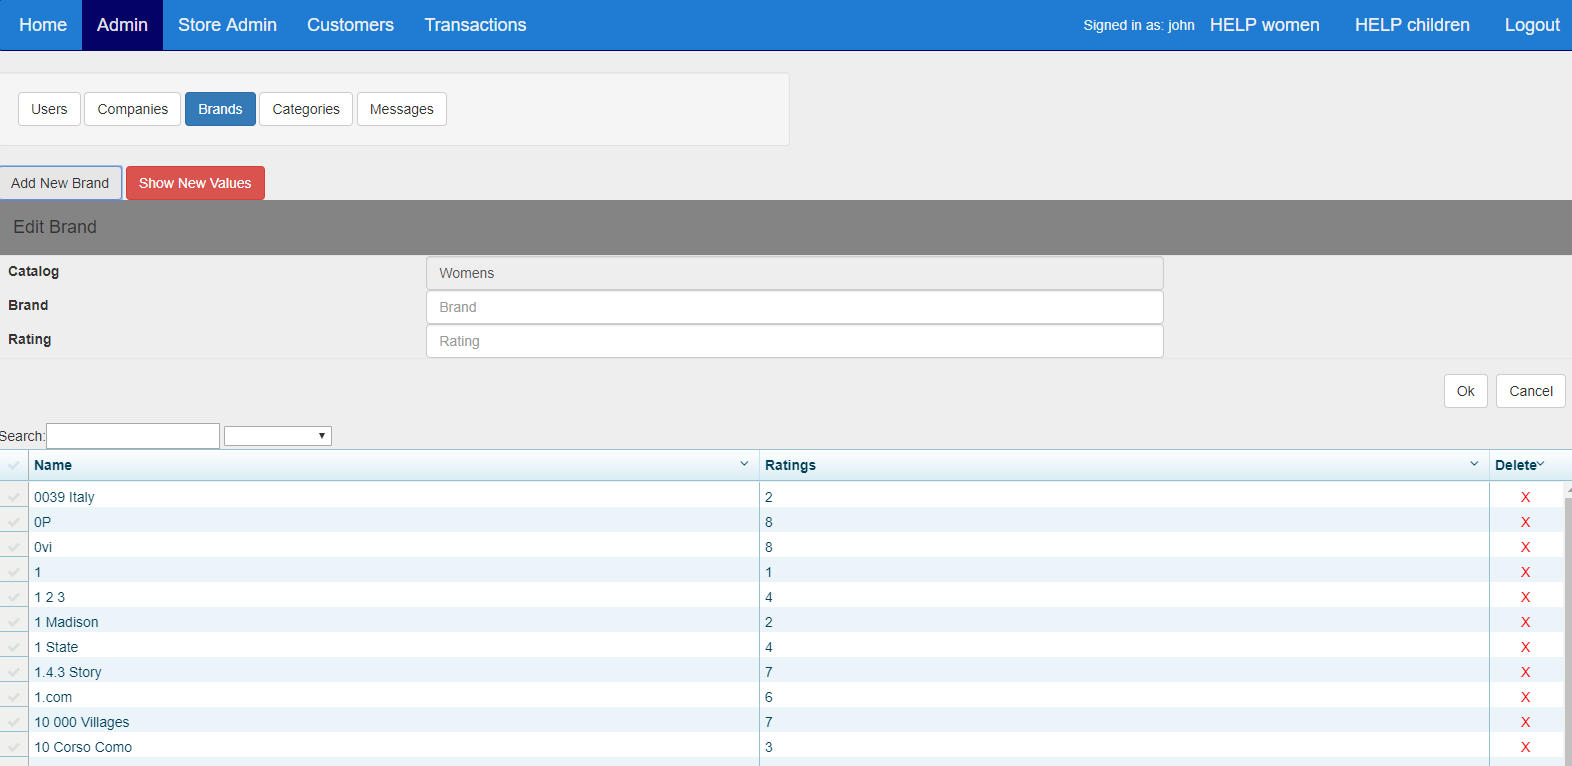
[Add New Brand]
calls up the ‘Add New Brand’ screen, which may be used to enter the name of a brand to be added. Optional: following the name of the brand, enter the Category and Price you assigned to the item . This can help assure that the NextGen Pricer’s rating of the brand is consistent with your assessment.
click[OK]
The Add Brand screen may also be used to identify an existing brand that appears to be generating prices that are too high or low.
This may be done by simply entering: the “errant” Brand followed by the name of the Category and Mid Price the Store Admin judges fitting for the item with that brand being entered.
NextGen may:
- assign a corrected rating to the brand so that the next time it appears it will generate prices more in line with the Brand’s value, OR
if the Brand rating is found to be correct, but the brand often sells at a somewhat lower or higher average price than suggested, NextGen may :
- append a minus (-) sign to the brand name indicating that the brand tends to carry prices lower than the suggested mid-price but closer to the suggested mid-price than to the suggested min-price, OR
- append an asterisk (*)to the brand name indicating that the brand tends to carry prices higher than the suggested mid-price but closer to the suggested mid-price than to the suggested max-price OR
- append a double minus ( –) sign to the brand name indicating that the brand tends to carry prices lower than the suggested mid-price and closer to the suggested min-price than to the suggested mid-price, OR
- append two asterisks (**) to the brand name indicating that the brand tends to carry prices higher than the suggested mid-price and closer to the suggested max-price than to the suggested mid-price.
Important: Any change in a brand rating must be universally applied to all businesses using NextGen, For this reason, NextGen cannot make changes that , in NextGen’s judgement, will not be right for other businesses using the Square Portal.
Brand Naming Convention
NextGen supports the use of the following syntax when entering Brand Names. It is designed to keep the # of characters under the 23 characters that can be printed on most tags, to reduce the number of keystrokes required to find and select brand names, and to minimize the number of duplicate brands in the system with name variations.
Use initial caps unless the literal Brand Name is comprised of all Caps or lowercase
- Use actual numbers, not their spelled out equivalents (e.g., 1, 2, …9, 1st, 2nd, 9th, specifically, 7 For All Mankind)
- No spaces or periods between individual capital letters (e.g., LL Bean, JJ Crew)
- Abbreviate where necessary, but do not abbreviate the 1st word
- Use symbols, with or w/o spaces before and after (e.g. &,/,’,#,…)
Note: The brand name will appear in the brand list once a rating has been added by nextGen.
Customers Screen
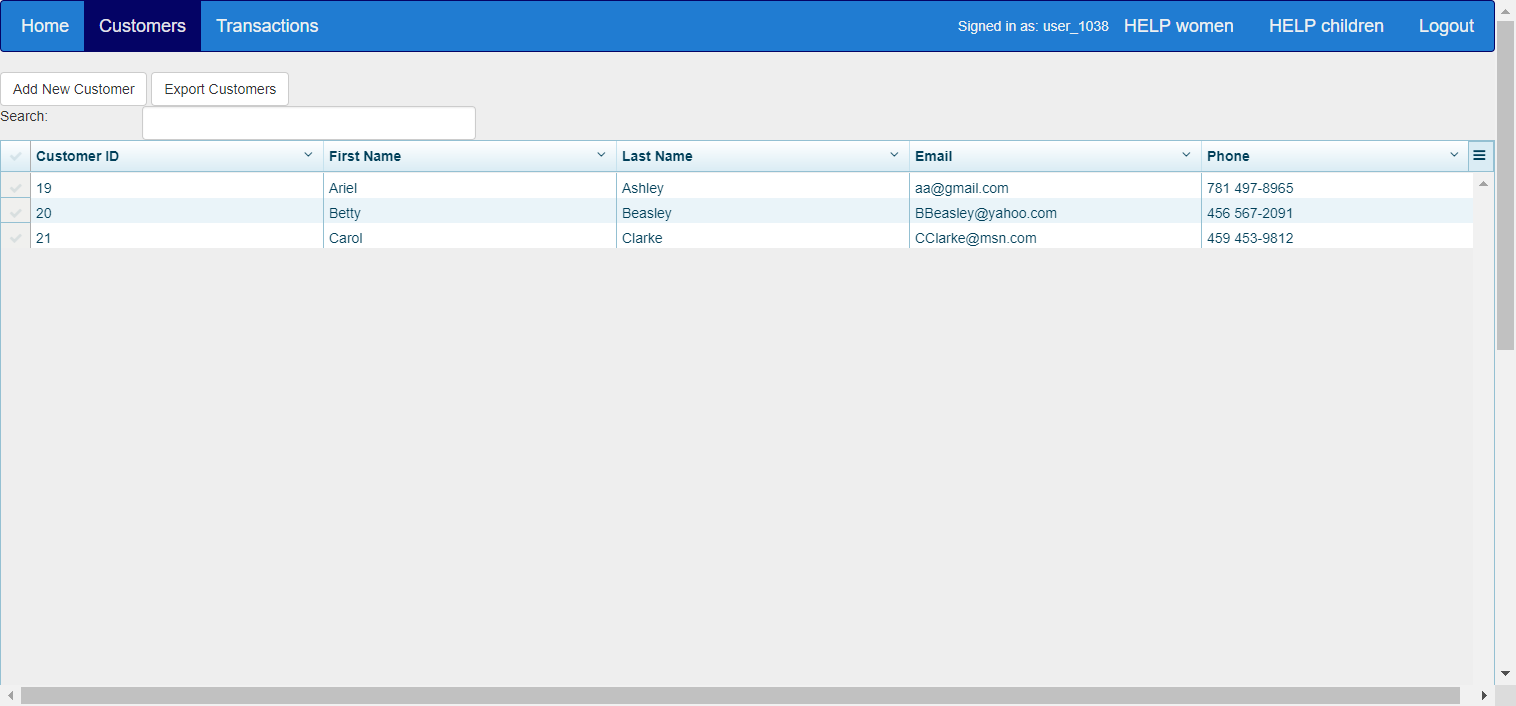
To locate the name and contact information for an existing customer, enter the Customer ID, First Name, Last name, Email, or Phone number in the Search field. The record will appear.
To view, change or Add Notes to a selected Customer’s contact information form and to view a list of any past buying or consigning transactions with the customer, Click on the Customer’s Listing. In addition to this contact information, the listing displays any past transactions, specifically: the Transaction ID, Date, Cost (total), Price(total), if paid via store credit (shows a 1), and whether the transaction was a buy(outright) or consignment arrangement.
Add New Customer
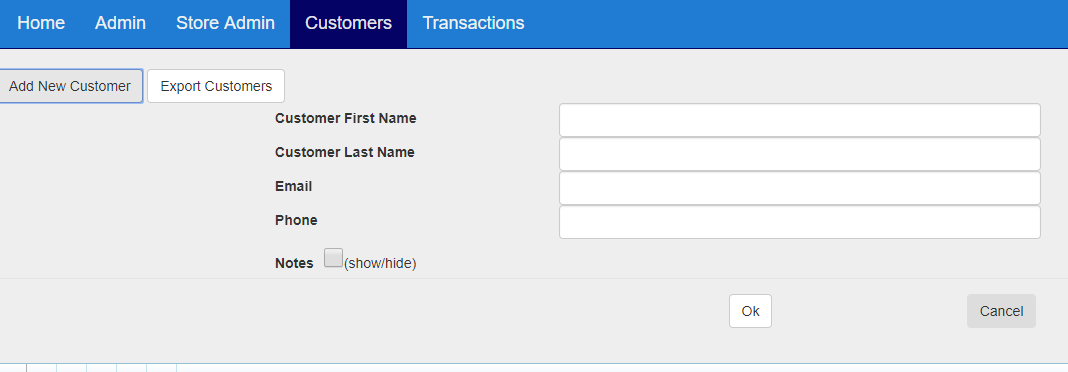
To add a new customer, click the [Add New Customer] button. Add the customer’s name, contact information and any notes to the Contact Form and click [OK]
Export Customer Information from Portal
The [Export Customers] function is designed to port the customer information to the downloads folder in a User’s computer for subsequent import to the Square Point of Sale (POS) or Square for Retail POS system where it can be used for customer contact, management and marketing purposes. The customers export file is titled customers.csv. If there is more than one customers export file located in the downloads or other computer folder, they will be titled customers(1).csv, customers (2).csv… .
The Customer Export file(s) consist of the following information: First Name, Last Name, Phone, Email and Reference ID. Note: Reference ID shows as the Customer ID in the Customer Screen
Click [Export Customers] to export all Customer Contact information added since the Last Export.
By default, the information will be downloaded as a “customers.csv” file to the Downloads folder of the user’s computer. Optionally, the information may be downloaded to another folder of the Store’s/POS Vendor’s choosing. This is typically set in the Downloads tab of the Browser Settings. Note: a pop-up screen may appear, allowing the user to choose different [Save] and [Print] options, the look of which will vary depending on the active browser.
Store customers may sell, consign and buy items from the store. Information on customers that only buy items from the store is not included in the Portal. Customer information exported from the NextGen Buying and Pricing Portal for import into Square includes information only for those customers that have sold or consigned items to the store.
NOTE Some Portal users, whose store(s) participate in the Square Customer Loyalty program, elect not to export and then import the customer information into Square. This is because the Loyalty Program charges are tied to the number of store customers, and not all of the customers, from whom they purchase or consign items, are “buying” customers.
Transactions Screen
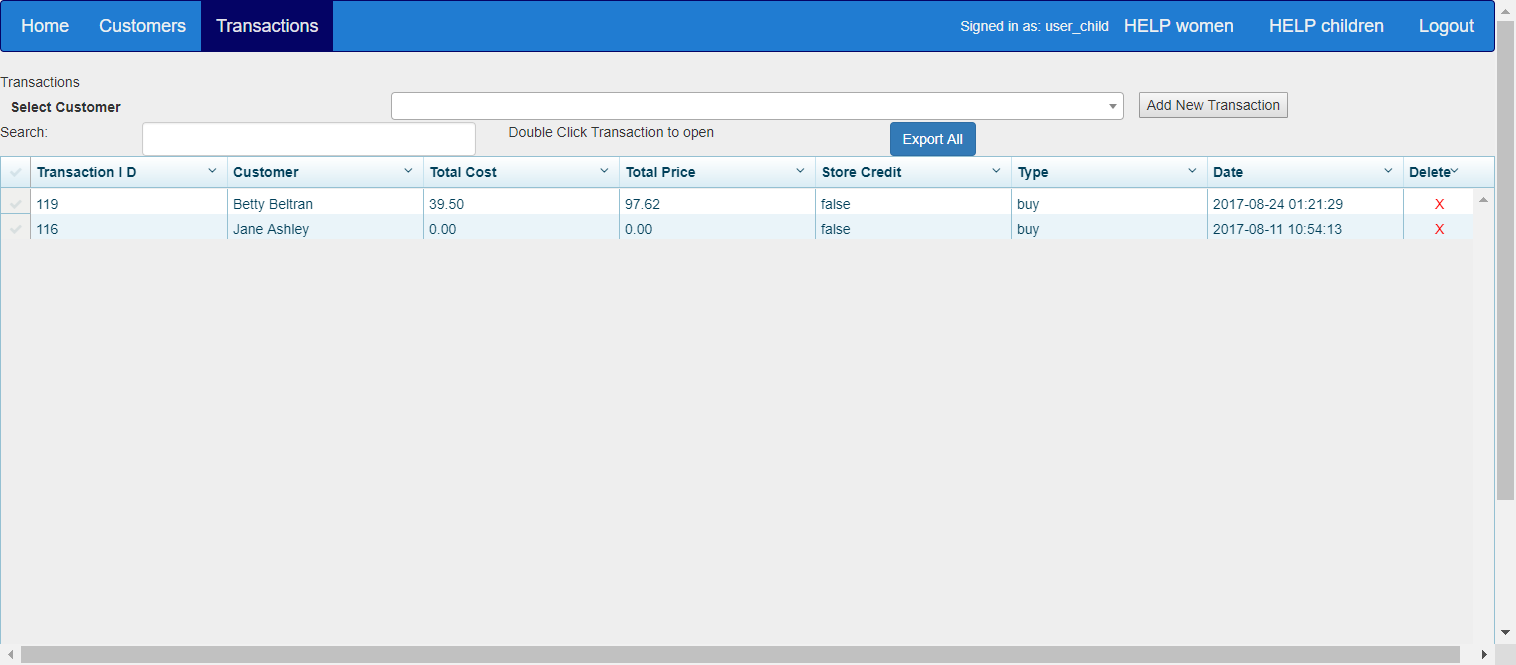
The Transactions screen is used to price and to purchase or consign items from sellers or consignors.
Click to enlarge
Modify an Existing transaction
Search for the transaction by entering the Transaction ID, Customer name, or Buy Date in the Search Field. When the sought Transaction appears in the listing, Double click it. The Record of the transaction (completed transaction screen) will appear. View or make any modifications.
Note: Items may be removed by clicking on the red X on the far right of the line where the item appears.
Remember to Click the Export Transaction button to download a record of the revised Transaction for subsequent import to the Store POS System for inventory management and sales management purposes. NOTE: Transaction information is ported to the Downloads folder.
OR
Add a New Transaction
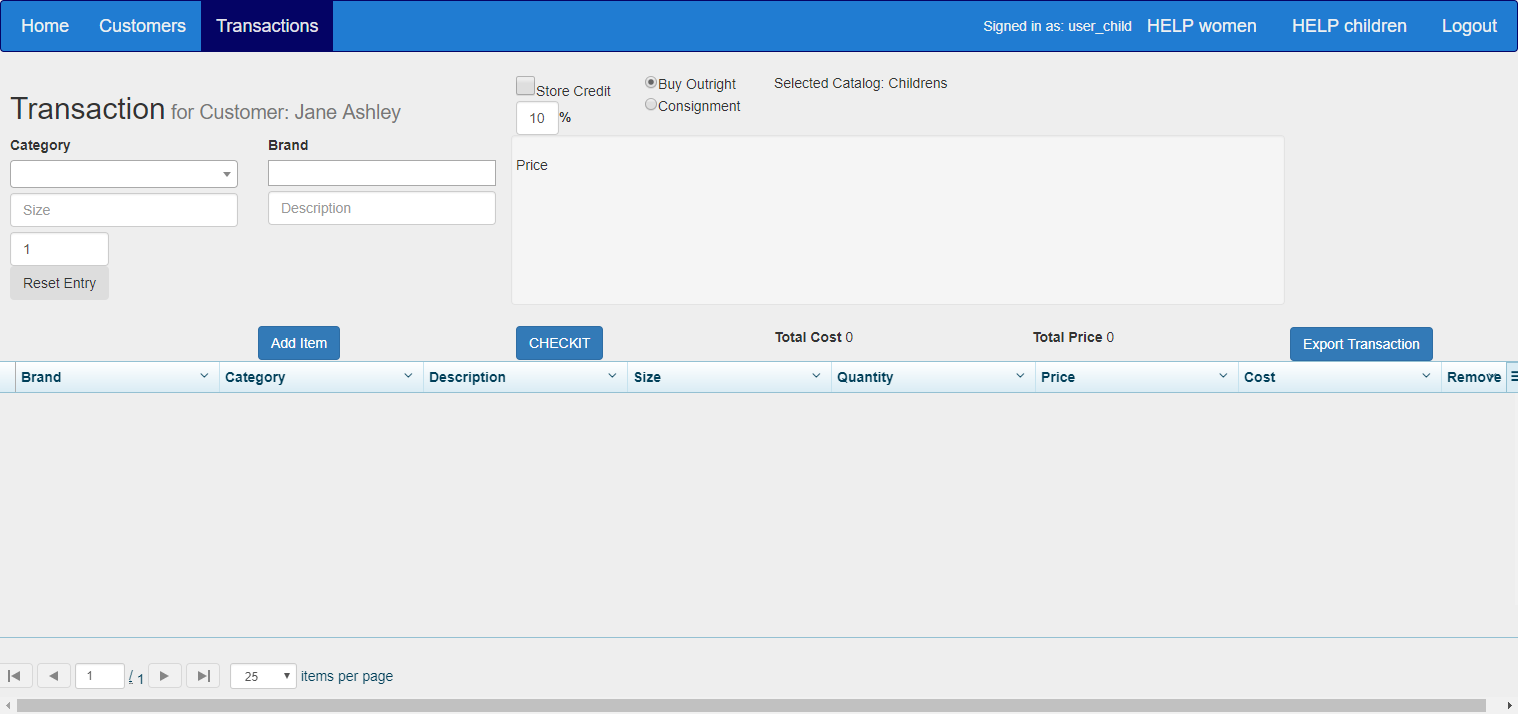
The first step is to Select a Customer. Start by entering the customer’s last name in the Select Customer field until the customer’s full name appears. Click the [Add New Transaction] button to list the transaction anew or atop the list of prior transactions with this customer (displayed in the lower part of the screen). Then double-click this listed transaction to open the Customer Transaction Screen. A Blank transaction screen will appear (as shown below).
Important: If the customer’s name does not appear
Go to the Customers Screen and [Add New Customer]
Then return to the Transactions screen to [Add New Transaction] as introduced above. A blank transactions screen will appear as shown above.
Enter Transaction information
Select the applicable Price Catalog
If There are four Catalogs consisting of suggested prices for : 1) Womens, 2) Mens 3) Childrens apparel, accessories, jewelry, footwear, toys and gear, and 4) Furniture (Home Furnishings). If a store is located in Canada, the Catalog selected should end in “CA”. Select the Catalog you wish to use by entering it in the ‘Selected Catalog’ field (located in the upper right portion of the screen.
Note: This step is necessary only if your store is offering items in more than one catalog, and then only if the Catalog of interest is different than the catalog that appears in the ‘Selected Catalog’ field.
Store Credit
If the seller/consignor would like to obtain an additional amount for their items by agreeing to spend the proceeds in the store, check the Store Credit box and enter the additional % they are to receive in the Store Credit field. The amount to be paid for (cost of) each item will to be increased by that percent. Note: this can be done at the beginning or end of the transaction. Checking and unchecking the store credit box and noting the difference in cost between the two, will indicate the amount owed if they elect to take store credit or cash respectively.
Important: As explained , In the Square section of this Guide, the use of the store credit would be similarly recorded but as a negative amount, i.e. with the amount showing in parentheses, e.g.,($5.50 10/14/ 19 “.
Buy Outright OR Consign
Check the Buy Outright radio button if payment is being made for all of the items accepted at the time of the buy, or check the Consignment radio button if payment is to be made only for those items if and when sold within the consignment time window. Make sure that the consignment box in the Transaction screen shows the correct % to be paid the consignor upon sale of the items.
Important: Items purchased and Items taken on consignment cannot be included in the same Transaction; in other words, if a consignor is selling some items and consigning others, a separate transaction and export would be required for each.
Add Items to the Transaction
Each item entry includes, at a minimum, the item Category, Brand and Quantity, and optionally, Size and Description.
Category
A List of CATEGORIES may be viewed by:
- selecting the Womens catalog, entering “Categories Women” in the Category field, and clicking the [CheckIt] button,
- selecting the Mens Catalog, entering , “Categories Men” in the Category field, and clicking the [CheckIt] button,
- selecting the Childrens Catalog, and entering the categories of interest: either “Categories Child”, “Categories Maternity”, or Categories Infant” in the Category field and pressing [Checkit].
- A list of “hone Furnishings” categories may be obtained on request by emailing support@NextGenResale.com.
To save or print a category list in view, Press the PDF or Printer Icons appearing to the top and left of the category list.
Note: Sometimes printing is possible directly, sometimes the list must first be saved.
Start keying in the Category name and choose from the dropdown list. As you enter each letter, the items matching the spelling will appear. Once the category comes into view, Click it or press the [enter] key.
If the category is not in the dropdown list, there are three options:
- Enter one of the general categories, e.g., “Clothing”, “Jewelry”, “Misc”, “Arts & Crafts”, “Outerwear”, “Footwear”, … in the ‘Category’ field, and after completing the ‘Price’, and ‘Cost/Net’ fields, then describe the item in the ‘Description’ field.
- [Add New Category] and optionally “Max”, “Mid”, “Min” prices by brand level in the Store Admin screen. Return to the Transaction Screen, select and continue the transaction. The Category may now be selected and any prices that have been entered on the Store Admin Screen will be suggested.
- Enter an asterisk (*) in the Category field and a temporary Category name in the Description field. The suggested prices, which may be overwritten, will show as zeroes.
Brand
Start by keying in the starting letter of the Brand name above the brand field, then start entering the brand name in the brand field; select it from the drop down list once it appears. Alternately, skip keying the first letter of the brand name and just start entering the brand name, select the brand name when it appears in the drop down list, then backspace (delete) the last letter of the brand name and retype it to generate the suggested prices Note: the need to enter the first letter of the brand name in the box above the brand field before entering and then selecting the brand name from those appearing in the brand field, is temporary and will be obviated when NextGen moves to a dedicated server.
On occasion Brands are found to carry prices at one level for some categories and at another level for other categories. Where this is found to be the case, there are multiple ratings for the brand indicating parenthetically the categories to which each rating applies.
If an item does not have a label (brand), the buyer may:
- Assume that the brand is a deeply discounted “off-brand” or effectively so as the label has been removed. Enter an asterisk (*) or C3 in the brand field. The suggested prices appearing are for off-brand items.
OR
- Evaluate the quality of the item and enter field one of alphanumeric ratings described earlier in the Store Admin screen (A1, A2, A3, B1, B2, B3, C1, or C2) in the brand field to generate the suggested prices associated with that rating.
- If a brand does not appear in the drop down list, it has not been rated by NextGen; and as suggested prices are in part dependent on brand, suggested prices do not appear. Add the Brand in the Store Admin Screen. Once added, it will be promptly rated by NextGen and hence forth appear in the brand list. To enter the item immediately, in the absence of referent suggested prices:
-
- first use the Online Retail/Resale Price checking process (later described) to derive a price
- then, enter the item with the derived price in the transaction screen. Enter an an asterisk (*) in the brand field in lieu of the brand name, and enter the brand name in the Description field.
-
Size
Enter the apparel or footwear size.
In the Women and Men Accounts, enter Size in the Category field, press the [Checkit] button and a table will appear allowing you to convert women, mens and juniors apparel and footwear sizes from non-numeric manufacturer conventions and metric conventions to standard U.S. numeric conventions.
In the Children Account, enter Sz in the Category field, press the [Checkit] button and a table will appear allowing you to convert infant and child apparel and shoe sizes from non-numeric manufacturer conventions and metric conventions to the standard U.S. numeric convention.
Description
Used as necessary to inform the customer and/or to inform (refine) an online price check.
Inform the customer. If a general category is selected, e.g. Clothing, Descriptions may also be used to highlight properties of a garment, footwear, piece of jewelry or accessory, toy, furnishing, … that may add or detract from its value.
Inform an On-line Price Check. As later explained, descriptors are also helpful in refining a search for online prices using the [Checkit] button.
Quantity
Enter the number of an item being purchased. The default is 1. Important: while a quantity greater than 1 may be entered, only item quantities of 1 may be imported into square and are recognized in Dymo for printing tags . In other words, in order for Square to import 3 of the same item into square and in order for Dymo to print 3 of the same item, there needs to be to be three entries of the same item in the Portal with a quantity of 1. As later explained in the [Add Item] section, up to 3 more of the same item may be entered by repeatedly tapping the [Add Item] button in rapid succession when entering the first of the items. If this results in extra item(s), simply delete them by clicking the X in the |Remove| column.
Price
There are nine (9) brand levels (price levels) for each category, from the highest valued (1) to the lowest valued (9). As a rule, levels 7-9 include lesser brands found in discount superstores online and off, local shopping centers & strip malls, levels 4-6 include brands found in department stores and shopping malls, levels 1-3, includes high-end brands found in top department stores and boutique shops. Level 1 includes the most exclusive, often designer brands.
Once The Category and rated Brand have been entered, a suggested “Max”, “Mid” and generally, a “Min” price will appear (as illustrated below). Smaller toy categories are defined by the size and composition, e.g. Toy Metal Med>6″, Toy Plstc Mini <3, Toy Soft Lg >12″, Toy Wood Med>6″ to quickly view the suggested price.
Once The Category and rated Brand have been entered, a suggested “Max”, “Mid” and generally, a “Min” price will appear (as illustrated below). If suggested prices do not appear, refresh the screen, by clicking the Refresh Icon or by exiting to a different screen and then returning to the transactions screen, re-entering the Category, Brand, … .
A “Max” price is commonly used for new (never-used) items or for items with embellishments, valued composition or style . The “Min” price may be used for less attractive items, items composed of inferior material (e.g. polyester), … The “Mid” price is the suggested average price at which the item should sell, though it may be increased or decreased considering item properties and features as later discussed.
The “max”, “mid” and “min” suggested price labels appear in small case letters for items with brands in levels 2-8. The MAX, MIN, MIN labels appear in all Capital letters for items with brands in level 1 or for brands in other levels where NextGen is unable to identify reliable suggested prices; this is intended to signal the user to utilize NextGen’s item-specific on-line price utility [Checkit] as opposed to the suggested prices showing (later explained) to better assure the “right” price for an item.
Important: At this time the NextGen Pricing System allows one to:
1) override a suggested price–in which case the cost computes automatically according to the Owner’s buy outright or consignment pay formula.
OR
2) override a suggested cost.
It does not allow one to override both the suggested item price and cost.
On occasion Brands are found to carry prices at one level for some categories and at another level for other categories. Where this is found to be the case, there are multiple ratings for the brand indicating parenthetically the category(ies) to which each rating applies.
In the final analysis, The Max, Mid and Min prices suggested are averages derived from resale and retail sales data. While they are generally reliable bench marks, some may be reported as too high or low by participating stores using the Brand Action Report later discussed. This generally owes to market differences in the appeal of some categories and brands, or to the fact that the brand’s prices, while at the correct level, are consistently above or below the benchmark averages at that level. Where the suggested price changes are consistent and not conflicting, they are indicated as a -, –, *, or ** suffix to the brand name indicating: the alternative price being suggested by some stores is lower but closer to the mid price than min price, lower and closer to the min price than mid price, higher but closer to the mid price than max price, or higher and closer to the max price than mid price respectively. Users may or may not decide to “right-price” accordingly.
Categories for which prices are not suggested and must be checked online include:
- General categories, e.g. Misc, Equipment, Arts & Crafts, Sleepwear, Outerwear, used in entering hard-to-categorize items.
- Categories, for which reliable prices cannot be suggested because there are many different styles/models and associated prices within the category are too varied and widespread, e.g. strollers, car seats, fragrances,
- Some Children’s Toy and Equipment categories, commonly discounted for brief periods by retailers (online and off) to generate traffic thereby rendering these prices too unstable to reliably predict (suggest).
- ALL Home Furnishings, given the wide variety in types, style, composition, condition, and most important of all, local availability and prices of like items.
- High end clothing, footwear, and accessories particularly where price ranges by category are too wide and where prices must be item-specific..
Cost
Suggested costs appear below the Max, Mid and Min Prices, once a category and brand have been entered as illustrated below.
Click to enlarge. 
When a price is selected, the corresponding cost is automatically entered as well. The suggested prices may be over-written as may the suggested costs. However both cannot be overridden for a single item. Once the desired price and cost appears or is entered into the “Max”, “Mid”, or “Min” box, select that box, and press [Add Item].
A “Max” price is commonly used for new (never-used) items and items, the properties of which place its value above those typically seen under the brand. The “Min” price may be used for some infant or child clothing and footwear categories in “Play” or “As Is” condition. NextGen recommends that these prices end in “7” as opposed to “9” so that customers can understand and appreciate the lesser price. , The Min price might also apply when an item of Women’s or Men’s clothing, footwear or accessory is viewed as unpopular, unattractive, flimsy, or otherwise below the standard for that category and brand.. The “Mid” price is the suggested average price at which the item should sell, though it may be increased or decreased considering item properties and features discussed in the Child Pricing Guide. The Pricing Guide and companion Buying Guide are emailed to Portal Users for review prior to Training.
NOTE. For items bought outright, NextGen sets the pay percentage(s) as part of the Pricing System’s setup at the owner’s direction. There may be a single percentage applied to all items or percentages may be set on a graduated basis, with the cost computed at a higher % of the suggested price for higher priced items and at a lower % for lower-priced items. Owners may have these percentages changed at anytime. The percent paid for items on consignment is specified in the Transactions Screen.
Reset Entry
Click the [Reset Entry] box to clear the Brand, Category, Description & Quantity Fields . This is sometimes necessary when entries have been changed in the course of entering and suggested prices are not appearing.
Add Item
Once the Category, Brand, Price, & Quantity and optionally Size and Description have been entered for an item, click the [Add item] Button.
Click to enlarge
 Each item added is listed in the lower part of the screen as illustrated below.
NOTE 1: At times, when different item entries (categories, brands, size, descriptions) are changed before finally adding an item [Add item], multiple items may be saved. If this occurs, just click the red X to remove the errant item(s).
NOTE 2: as noted earlier under Quantity while a quantity greater than 1 may be entered, only item quantities of 1 may be imported into square and are recognized in Dymo for printing tags . In other words, to enter 3 of the same item into square, there needs to be to be three entries of the same item with a quantity of 1.
Total Price
The cumulative prices of the items entered as part of the Transaction is displayed in the Total Price field.
Total Cost
The cumulative cost of the items entered as part of a Transaction is displayed in the Total Cost field.
Payment for consignment items is not due until after item(s) are sold. Payment for items purchased or taken on consignment may be in the form of cash, check, or store credit. The amount paid in store credit exceeds the amount paid in cash or check by an agreed upon % in consideration of the customer’s agreement to spend the store credit in the store.
Remove Item(s)
Information on each of the Items added as part of the transaction is listed in a separate row on the lower part of the page. If an item needs to be removed, Click the X in the Remove column. If any of the information on an item needs to be changed, first Click the X in the Remove column, then reenter the item correctly, i.e., add the item anew.
On-Line Checks
There are a number of on-line functions that can be helpful in the buying process: 1) Price checks, 2) Category checks, 3) Size checks, 4) Currency checks, 5) children’s toy & equipment Recall checks and 6) Children’s Car Seat Expiration checks. These are described below. These functions are activated by entering the name of the function in the Category field and clicking the [Checkit] button. In the case of Price checks, the function reads entries in the Brand and Description fields as well to better help pinpoint the Item of interest.
Retail/Resale Price Checks
Though buyers can’t afford the time to do so routinely, the surest way to price an item is to check its price online. Indeed, as explained earlier, for some categories there is no alternative. To Price-check any category , enter the Category in the Category field, Brand in the Brand field, and the style, composition (e.g. cashmere), particular store of interest (e.g. Nordstrom, Walmart…), and any other notable item descriptors in the Description field and press [Checkit]
Resale prices for used items in good condition are generally set at:
- 30-35% of retail prices for clothing, footwear, accessories, small toys and costume jewelry*
- 40-50% of retail prices for fine jewelry*,
- 70-80% of retail prices for Home furnishings, less 5% per year depreciation*.
* Add 10% for items never used
In the cases of high-end items, some selected online price-check sites offer a richer set of reliable prices than google. To view these prices enter the name of the site, e.g.:
- www.therealreal.com
- www.polyvore.com
- www.vestairecollective.com
- www.fashionphile.com
- www.lindasstuff.com
- www.materialworld.com
in the Description field.
Note: The default pages appearing in Online-price checks are Google shopping Pages; mostly retail and some resale prices generally appear. If only resale prices appear it means that the Brand has no contract with Google to appear on the Shopping Pages, or the brand is no longer current and is for sale only through resale outlets . In the first instance selecting [All] at the top of the Google Shopping page will move to a generic page on which retail prices should appear.
If the online-page is filled with extraneous items, modify the descriptors in the search field at the top of the shopping page and/or click [All] for better results.
Buying and Pricing Guide Checks
Women Catalog. Enter “Guide” in the Category field and press [Checkit]. .The Buying Guide will appear; it may be read, saved or printed. The Guide identifies what to buy or take on consignment for resale and what not to buy or take on consignment for resale. It further defines where to set the price within the suggested price range as a function of item: 1) Condition, Quality, Supply & Demand. It’s a helpful resource.
Children Catalog. Enter “Pricing guide” in the Category field and press [Checkit]. The Pricing Guide, explaining why and how the NextGen Pricing for children works. Setting prices that informed customers see as a value—not a steal, nor an insult—is important to keeping customers satisfied, trusting and returning. Pricing right depends on paying right. It is important to pay sellers a fair price, with enough of a margin between the purchase and sales price to cover your costs and return a reasonable profit.
Enter “Buying-Guide” in the Category field and press [Checkit]. The Buying Guide will appear. This “Smart” buying guide reflects the experience and input of children’s resale shop owners around the country. Smart Buying covers the policies, practices, methods, techniques and systems for making the resale buyer’s job manageable and for assuring that the merchandise purchased is both salable and profitable.
Men Catalog. There is no Guide at this time, but much of the information in the Women Guide applies to Men.
Home Furnishings Catalog. It’s not possible to offer suggested prices for home furnishings as there are too many variables. The quickest and surest way–the only way–to find a fair and competitive prices for furnishings is to go online, Look for items as similar as possible to the item of interest. Enter the, category/type, style/ model in the Category field, the Maker/Brand in the Brand field, and any other descriptors, e.g. composition, features, condition, age, a particular site(www.?) you wish to check, or any other price-related information in the Description field and click [CheckIt]
- Some rules of thumb to arrive at an equivalent price to a price found online:
-
- Always add any shipping costs
- Reduce the price of a new item by 20%
- Add or subtract 3% of a used online item’s price for every grade (poor, fair, good, very good, like new) the online item’s condition is from that of the item of interest
- For every year of difference in the age of the item to the item of interest beyond 2 years, add or subtract 5%
- Some furnishings sell better and at relatively higher prices than other furnishings
- Inferior brands (e.g. Ikea, )and items made of inferior materials (e.g. particle board, plastic, .. sell for less, often much less than “better quality” items
- There is less demand for larger furniture and for custom-made furniture, than for smaller, non-custom made furniture and prices so reflect.
- Simple styles sell better than more specialized or period-specific pieces. A neutral, contemporary style generally sells better than something that’s more specialized or period-specific, unless that style happens to be in demand
- The Money Pantry provides additional information of value..
Category Checks
Enter:
“Categories Women” in the Category field of the Women Catalog,
“Categories Men” in the Category field of the Men Catalog,
“Categories Child in the Category field of the Children Catalog,
“Categories Furnishings” in the Category field of the Furnishings Catalog, and
press [Checkit]. A list of the Categories will appear for reading, saving or printing.
Size Checks
In the Women or Men catalogs, enter “Size” in the Category field and press [Checkit], to see tables of apparel and footwear sizes for Women, Men and Juniors in U.S. and European size conventions. In the Children catalog, enter “Sz” in the Category field, press [Checkit] and tables will appear allowing you to quickly convert apparel and footwear sizes from size classifications peculiar to different brands to the standard numeric classifications commonly used to order footwear and apparel for display.
Currency Checks
In the case of items priced in other than U.S. or Canadian dollars, in any of the Catalogs, enter “Dollars” in the Category field, press [Checkit] and a page will appear allowing you to quickly convert a foreign currency to U.S. or Canadian dollars respectively.
Recall Checks
Recall checks are peculiar to the Children Catalog. As discussed in the Buying Guide, Children’s Resale stores must not sell items that have been recalled by the Consumer Product Safety Commission (CPSC) and National Highway Traffic Safety Administration (NHTSA). To determine if an item (CATEGORY/Subcategory) has been recalled, enter the CATEGORY/Subcategory in the category field. Leave all other fields blank, and press [Checkit]. NOTE: In cases where an item of equipment has a common name (e.g., PUZZLE, …as well as multiple variations )e,g, PUZZLE Foam Lg, PUZZLE WD TODDLER Sm, …, both the common name or any of the variations will work. In the case of Clothing recalls, enter either INFANTWEAR or CHILDRENSWEARr rather than a specific clothing CATEGORY/Subcategory. As a general rule, DO NOT purchase for resale any infant or child size garments with drawstrings or any sleepwear that does not have the federal flammability tested tag on it. In the case of toys, play it safe with the better known brands and commit those to memory as best possible. In the case of equipment, best practice is to check each time until committed to memory.
A recall page will appear listing hyperlinks to details on all relevant CPSC and NHTSA recalls in alphabetical order by Brand & Manufacturer name. Double clicking a hyper link will take you to an official page providing recall details.
To move to a Google web page or shopping page for the Recall category, click on Shop at the top of the Recall Page.
Where hyperlink(s) on the recall page have a $ sign in front of them, double clicking on the $ sign will take you to a page displaying current prices relating to other models of the category and brand presently being sold.
Car Seat Expiration checks
These checks are peculiar to the Children Catalog. All Car seats have expiration periods. No car seat should be purchased for resale unless it has at least 2.5 years remaining prior to its expiration date. Either the date at which the Car Seat’s safe life expires or the Date of Manufacture is posted somewhere on the Car seat. In the latter case, the Expiration date must be calculated based on the Seats’s useful life. To determine the remaining life of a car seat, Enter “Car Seat Expiry” in the Category field and press [Checkit]. Expiration periods are listed by type of car seat (infant, booster and convertible), manufacturer and model.
To Price-check clothing and footwear, enter the Category in the Category field, Brand in the Brand field, and the style (e.g., full length), particular store of interest (e.g. Nordstrom), composition(e.g. cashmere) and/or any other noteworthy item descriptors in the Description field and press [Checkit]
To Price-check toys & equipment, enter the Category in the Category field, Brand in the Brand field, and the model or name in the Keywords field (e.g., Toy | Fisher Price | xylophone; Gate | Evenflo |Top of the Stairs. You might include still other keywords such as: the name of a particular store of interest (e.g. Walmart), composition(e.g. metal, wood) and/or any other item descriptors in the Keywords field, and press [Checkit]
Store Obligations to Sellers
Store payment obligations to sellers, be they cash or store credit appear in the Customers Screen of the NextGen Buying Portal (as illustrated below), These payments are listed in the customer’s account by Transaction ID # and are shown as costs.
Note: Unlike costs noted in a Buy transaction, costs noted in a Consign transaction represent potential payments, not actual payments; payments to consignors are made only for items if and when they sell.
Transaction Log
While the NextGen Portal and Square applications include the Transaction information in electronic form, NextGen encourages Owners to maintain a paper Transaction Log, such as that shown below; it includes the customer’s signature attesting to the accuracy of this information and serves as a ready bookkeeping source for the Cost of Goods Sold and for reference in addressing any customer questions.
Enter “Transaction Log” in the Category Field of the Add Items Screen and press [Checkit] to bring up the Log. Click it to view and print.
Export Transaction Information
There are two Export Files designed to download the transaction information on items that have been purchased or taken on consignment to the Downloads folder in the Seller’s or Consignor’s Computer for subsequent import to Square or Square for Retail and possibly to Dymo for the printing of labels . Click the [Square Export] button to export the transaction information for import to Square, or the [Square RETAIL Export] button for import to Square for Retail to the Seller’s or Consignor’s downloads folder..
The Transaction export files are titled “Items” followed by an underscore “_” and numeric Customer ID.csv, e.g. Items_119.csv. The Downloads folder may be found via Windows Explorer. In recent versions of Mac OSX, the downloads folder can be accessed from the Dock. Method 2: OR From the Finder, click Go from the menu bar and select Downloads. If you don’t see a Downloads option under the Go menu, click Home. The downloads folder should also be visible in your Home folder.
Print Transaction
The “items####.csv file located in the Downloads folder may be printed if a hard copy of the transaction is needed.
Labels & Tags
Labels and Tags can be printed in the Square for Retail system using a Dymo or Zebra Printer, or printed in the Dymo application directly as described below. Printing instructions for Square for Retail system may be found in the Square for Retail Guide or Help Screens. Labels and tags cannot be printed from Square.
Dymo Labels
The Dymo application is used to select the label type to be used, to layout how the information will appear on the label, and to print the labels. Note: Dymo printers print paper labels only with adhesive backing. The labels with backing included may serve as Tags or the labels may be adhered to card stock tags of some sort.
There are two stages involved in printing labels: 1) Selecting a label type and layout, and 2) printing labels for the items in the Items###.csv File
Stage 1: Label Type and Layout
Select the label type and layout you want to use. This need be done only once and saved.
You may choose from a number of label types and formats. NextGen recommends the Return Address Labels 1 1/8”x3.5” or Library Book Spine labels . The cost is low and the space available is ample.
Arrange the Data fields in the Layout. Nextgen suggests 3 data fields; Price, Size and Description.
[Save] the Label Type & Layout under a name of your choosing
Stage 2: Import Data and Print
This is done from the File menu. IMPORTANT: Either Microsoft Excel, Mac Apple Numbers, Google Sheets or an open source equivalent (e.g. Apache) must be resident on the device to which the CSVs are downloaded to execute the import described below.
- Click [browse]. Select the desired Items_###.csv file in your downloads folder. Open.
- Click the blue [next]box. You should see the formatted label on the screen.???
- Select the formatted Label. It will appear on the screen
- Type “$” (a dollar sign) in the Price box
- Type the word “Size” in the Variation Name Box
- Click your mouse in the empty box next to the dollar sign. Then, click the price column from your data fields. The price should now populate the formatted label.
- Click your mouse in the empty box for size. Then, click the Variaton Name column from your data fields. The size should now populate the formatted label.
- Click your mouse in the empty box below price and size. Then, click the description column from your data fields. The description should now populate the formatted label.
- Click [next] on the bottom of the screen.
- Finally, select your Dymo printer. You may give your data a name if desired. Any item(s) for which you do not wish to create label(s) may be unchecked prior to clicking [print].
NOTE: see YouTube Videos for visual instruction, e.g. youtube video.
Import Portal Information to Square Point of Sale (POS)
Customer Reference # & Contact Information and Transaction Information export files may be imported.
IMPORTANT: Either Microsoft Excel, Mac Apple Numbers, Google Sheets or an open source equivalent (e.g. Apache) must be resident on the device to which the CSVs are downloaded to execute the import described below.
Entering or Importing Customer Reference # and Contact Information and to Square or Square for Retail
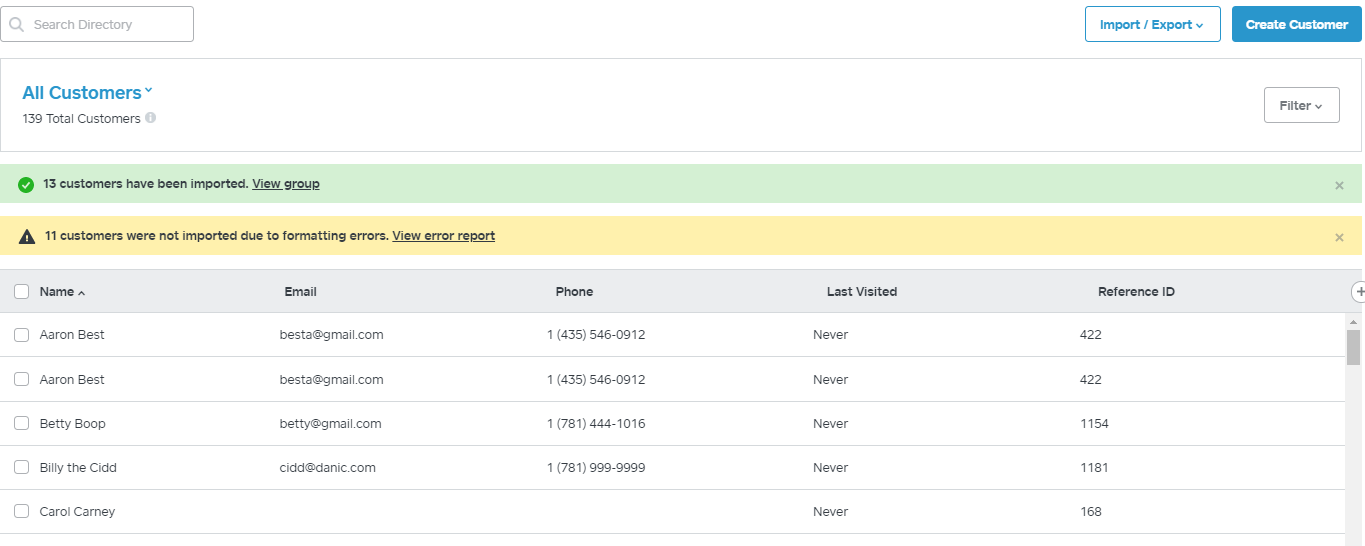
In Square Dashboard [Customers] > [Directory], a screen shot of which is shown below :
EITHER
ENTER the Customer Contact Information manually by first selecting
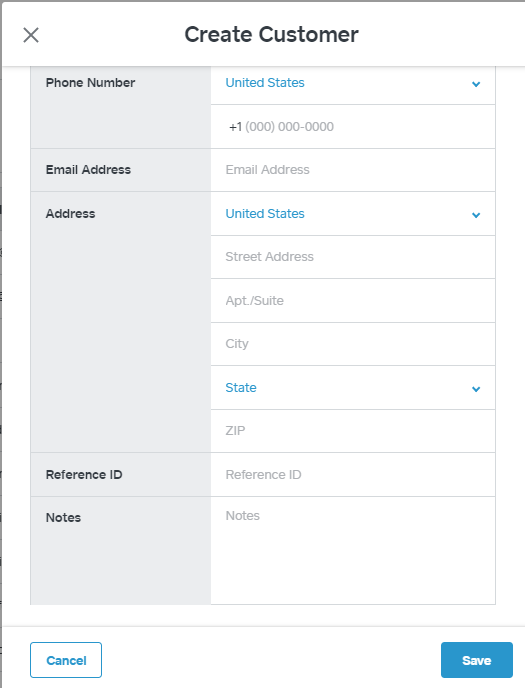
- [Create Customer] to call up a Customer Profile (as shown below), and then manually entering each customer’s ‘name’, ‘phone #, ’email address’, and Reference # [SAVE]
OR
IMPORT Customer Contact Information and Registration #’s
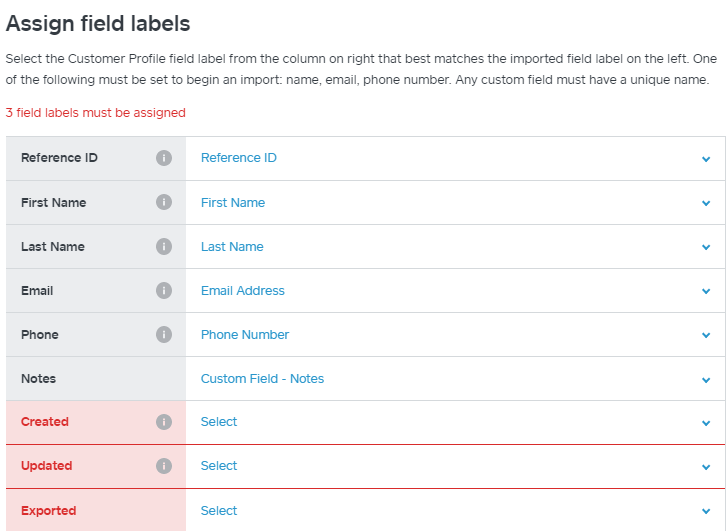
In the Square Dashboard,: select [Import/Export] & [Import Customers] “Skip” the Template and click [Next] to See the required Phone # format, which is: (###) ###-####, then NEXT again.. As prompted, Upload the customers###.csv file from the downloads folder. The “Assign Field Labels” screen will appear as illustrated below.
This screen matches the Columns in the Customers###.csv file exported from the Portal (shown in gray below) and the Square Customer fields (shown in blue below). If, for any reason, there is a mismatch, selecting the down arrow in that pairing, will offer alternative Square customer fields from which to choose.
Any Columns that are unassigned (i.e. w/o a match appear in red. Either assign any such columns to one of the fields shown in the dropdown list, or select “Do not Import” if the columns contain no information or the match of interest is not listed.
.If and when the Export column headers and Square fields are aligned, select [Import]
As illustrated below, If all the customers in the Export File are not imported, the number imported will show in green and the number not imported will show in yellow. Clicking on the error report will detail why customer(s) were not imported and clicking on the green and yellow bars will indicate the individual customers imported and not imported respectively.
NOTE:The management of payments to both sellers and consignors is covered in a later Section.of this Help screen.
| Token | Category | Item Name | Description | SKU | Variation Name | Price | Quantity |
| Token | Category | Store Credit | Item Name | Description | SKU | Variation Name | Price | Quantity | Cost |
This is a two (2) or three (3) step process. The first two steps involve the import of the Transaction Export file into Square or Square for Retail. The third step involves updating the record of the consignor or seller involved in the Transaction.
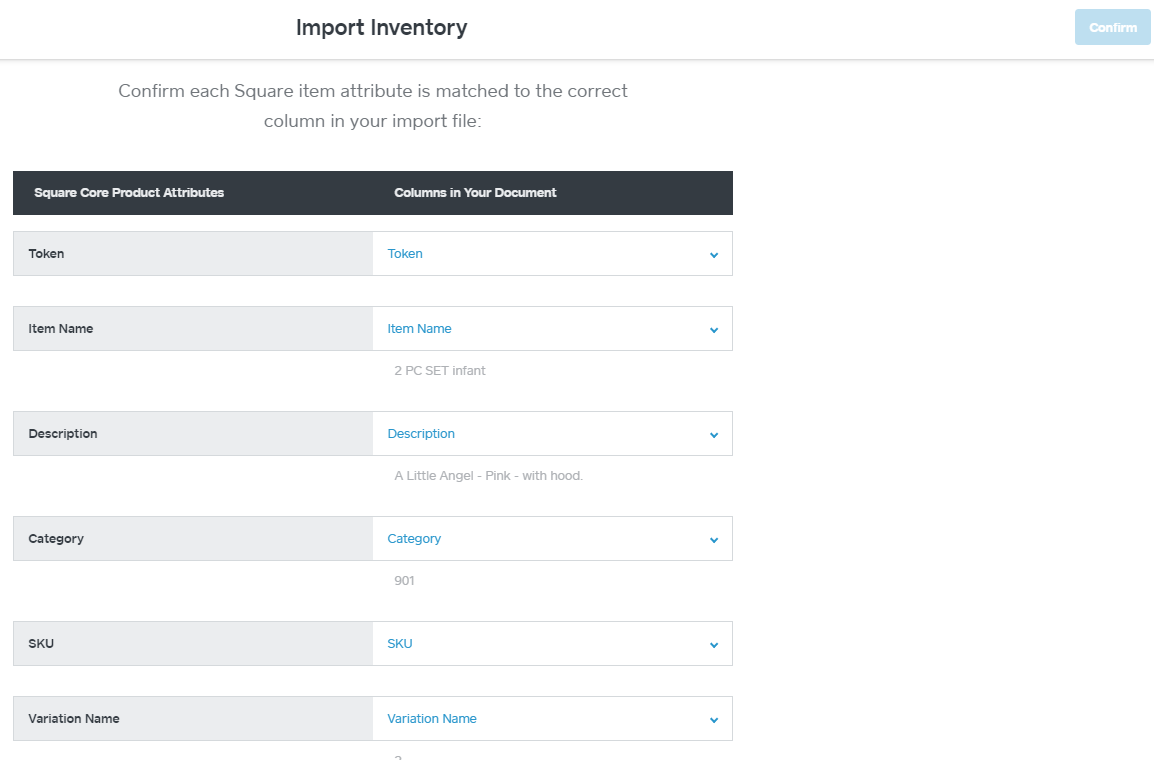
STEP 1. Import Transaction Export File(s) into Square or Square for Retail. In the Square Dashboard,> [Items] > [Item Library]> [Actions]>[Import Library] > [Modify Item Library]> [Next] > Select the Items.csv File to be imported into Square >[Upload] A screen like the following will appear.
Note a: Microsoft Excel or Mac Apple Numbers, Google Sheets or Open Office Calc are required to generate the .csv files exported from the Portal and Imported to Square or Square for Retail,
Note b: If the items file is not listed, it is because the default file type (showing in the lower right portion of the screen) is .xls and not “All files”. Change it to read “All Files.”
Note c: Some of the Column headers in the Items###.csv file export no longer agree with the headers in the Portal Transactions screen. They have been renamed in order to match the format required for import into Square or Square for Retail.
Any Square item attributes not matched to a header in the Items###.csv file will show in red. Match any such Attribute(s) to the appropriate Columns in the Items###.csv file selected for import–each of the Items###.csv file Column headers has a drop down list of all possible headers allowing for the selection of a Column Header other than that showing. This should NOT be necessary.
Click [Confirm] in the upper right corner of the screen, and then [Continue and Overwrite]
Should an error appear in Red indicating missing columns and content, quit the import by clicking the X in the screen (upper left), then open the Items###.csv file being uploaded for import, make the correction(s), return to the Square Dashboard and continue the import.
The Items Directory, now including the imported item(s), will appear as illustrated below.
Click to enlarge
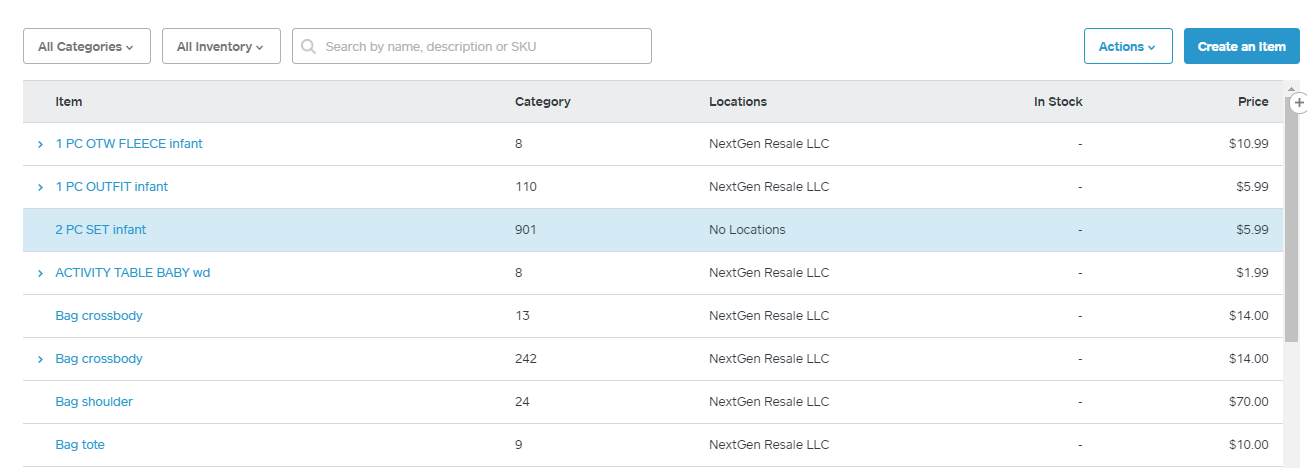
Worth Noting, unlike the Square for Retail POS system, the Square POS system does not support the use of barcodes, i.e. does not include the ability to speed the checkout process by scanning the barcode on the tag, instantly entering the item, brand, size (where applicable), any description, and price into the sales register. For this reason, some Square users who buy items outright and do not take items on consignment, i.e. where tracking sales and inventory item by item isn’t necessary, elect to use the Items### .csv solely to print tags in Dymo. They do not import Items into Square. Instead, to avoid the time consuming process of entering items at checkout manually from the item, brand, size, description, and price on the item tags, they simply enter one of the less-specific names they wish to use for tracking sales. For example, instead of entering blouse, shirt, tee, tank, tunic, polo…, they enter Top, or instead of entering stuffed animal, exersaucer, play car, puppet, building blocks, ball,… they enter Toy. The detailed item information is on the tag / label, and is most always required with any return.
STEP 2. If the Transaction being imported is a Consignment Transaction
Repeat Step 1. This is necessary because consigned items are tracked in Square by Category* and items are assigned a
Category on the 2nd import, but not on the 1st.
* The Category number in Square is the same as the Customer Reference Number in Square Customer records and in the Customer screen of the Portal.
STEP 3 Updating the record of the customer involved in the Transaction
In the Square Dashboard > [Customers] > [Directory] > [Search Directory]
- Enter the name of the Customer and select the customer when the customer’s name appears in order to open his or her profile.
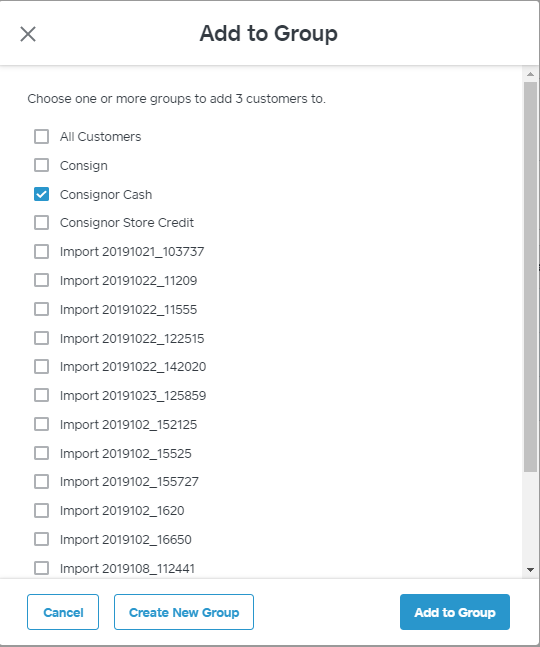
- If the Items in the Transaction are consigned for Cash, consigned for Store Credit, or sold for store credit, toggle the Consignor Cash, Consignor Store Credit, Seller Store Credit button on respectively, if it is not already.
- If the items were sold for Store Credit, enter the date of the transaction and the dollar amount of the Store Credit in the Store Credit $ field, e.g. 8/14/2019 $63.50. [SAVE] Important: A Customer and Transaction needs to be entered immediately if a seller has opted for store credit and wishes to use it for store purchases right away. If the Customer Record and /or Transaction is later imported, the Square Item import utility will not duplicate the entry, and will identify and alert the user to the duplicate customer record, allowing for it’s deletion.
Manage Consignor and Seller Payments
The Square Point of Sale (POS) System and Square for Retail POS system have the capacity to support resale and consignment businesses in four ways: 1) determine the $ sales of consigned items during a consignment period as a basis for calculating payments owed consignors, 2) record related cash and store credit payments to Consignors, 3) record store credit payments to sellers, and 4) register the use of store credit by both consignors and sellers.
1) Determine the $ sales of consigned items during a consignment period and calculate the corresponding payments owed consignors
Determine the $ sales of consigned Items during a consignment period by Category # (Customer Reference ID #)
Identify the Consignors, both those consigning for cash and those consigning for store Credit.. In Square Dashboard: [Customers] > [Directory] >
Identify the Group of Customers who have consigned items for cash: [Search All] > [Filter] Select ‘Consignor Cash’. Customers having consigned for Cash will be listed.
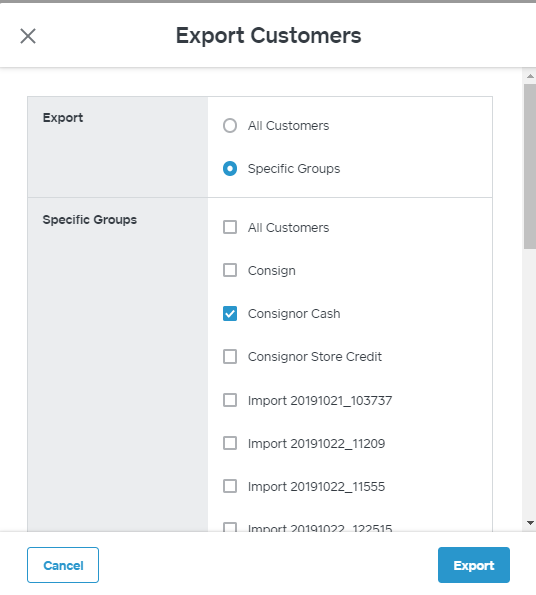
Export this group of Consignors to a .csv file
The list of Customers having Consigned for Cash as shown earlier will again appear.
[Import/Export] > [Export Customers] Select “Specific Groups” and “Consignor Cash’ [Export]
[Download] a spreadsheet like that pictured below listing including the names and reference Id’s (numbers) of the customers in the Consignor Cash group.
Identify the Group of Customers who have consigned items for store credit:
Repeat the Steps above but for the Customers who have consigned items for Store Credit
Determine the $ Sales of Consigned Items during the period of interest.
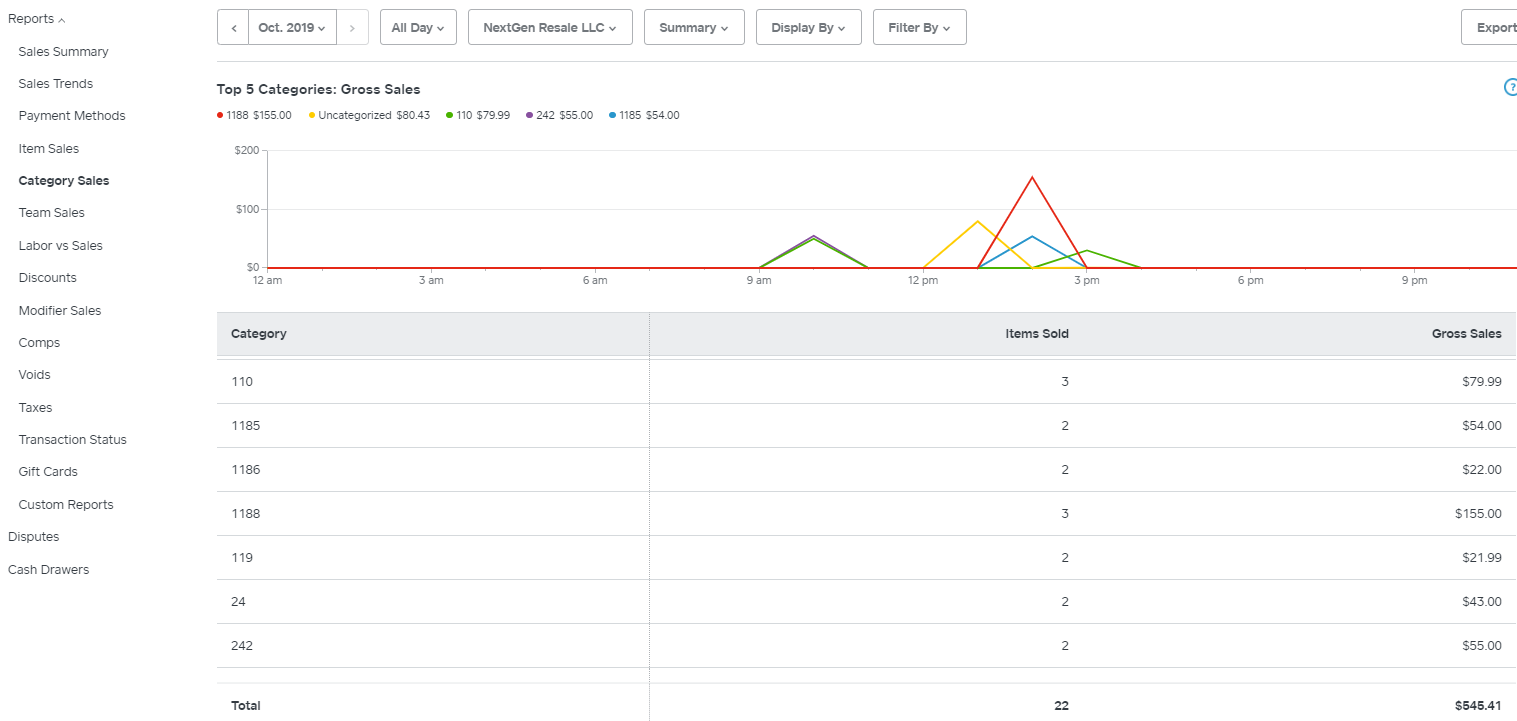
In Square Dashboard, [Reports] > [Category Sales] > Specify the Time Period of interest on the screen that appears. The report will list Net Sales by category #, i.e. by customer reference # (category numbers and customer reference numbers are the same).
[Export] the Category Sales Report. The resulting Excel File will look like this.
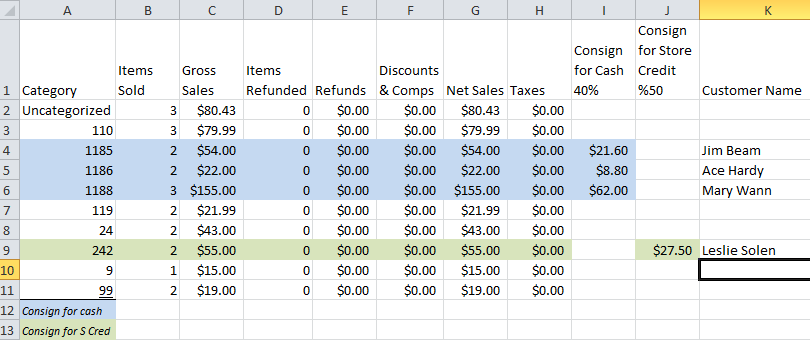
Calculate the amounts earned by customer reference #s within the consigning for cash and consigning for Store Credit groups.
As illustrated below,, in the Category Sales Export (spreadsheet)
- mark or highlight the reference #’s of Customers having sold items on consignment for Cash or Store Credit during the selected consignment period,
- add two columns to the Exported Sales by Category File to calculate the amount that each of the customer(s) listed in in the Consign for Cash and Consign for Store Credit Groups earned with the sale of their item(s)The earned amount will be derived by multiplying the net sales for each Reference # (consignor) by the percent (%) the consignors earn for the items sold during the period, and
- add the name of the customer associated with each consignor reference number in a third column..
Note a: Microsoft Excel or Mac Apple Numbers, Google Sheets or Open Office Calc is required to perform these calculations.
Note b: This spreadsheet, printed or electronic, is the source document from which all Consignor cash payments and store credit obligations derive.
Record a cash payment. When a cash payment is made to a consignor for items sold, in the Square App menu:
- Tap Reports > Current Drawer
- Tap Paid In/Out
- Enter the payment amount and Consignor’s name and/or Reference ID(s)
- Tap Paid Out
- Tap Confirm Paid Out
Record a store credit obligation
In Square Dashboard [Customers] > [Directory] > [Search Directory] for each Consignor owed store credit. In the ‘Consign Store Credit $’ field of each Consignor’s account, enter the last date of the consignment period for which the amount owed was just calculated, and enter the amount of store credit earned as recorded in the exported Sales by Category spreadsheet, e.g. 9/30/2019 $45.50.
4) Register the use of Store Credit by Consignors and Sellers
When a customer indicates that they would like to use their store credit in making a purchase:
- Identify their current store credit balance in either the Consignor Store Credit $ field or Seller Store Credit $ field, as applicable, via the Square App or Dashboard
- Choose “Other Payment Method” > “Other Gift Card or Certificate” > In the Consignor Store Credit $ field or Seller Store Credit $ field, enter the store credit amount used in the purchase > where applicable, enter any other form(s) of Tender being used in conjunction with the store credit to cover the purchase, [Tender] > Tap the boxed “person” symbol in the upper left corner of the screen to view the customer’s account. Open the Consignor Store Credit $ field or Seller Store Credit $ field, as applicable and enter the date and amount of Store Credit used (in parentheses) below the last line, e.g.,
10/31/18 $12.00
11/30/18. ($5.99)
[Save]- Tap Reports > Current Drawer
- Tap Paid In/Out
- Enter the Store Credit payment amount, the Seller’s name and Square Transaction #
- Tap Paid Out
- Tap Confirm Paid Out to register the use of (i.e. payment with) the store credit, in the Square menu:
Note: This payout will appear on the Square Drawer report for accounting purposes.
Manage Consignor and Seller Inventory
Just as exports (downloads) of Item Sales data to Excel .xlsx or .csv files can be used in conjunction with the spreadsheet of Customers having consigned items for cash (Consignor Cash Group) and spreadsheet of Customers having consigned items for store credit (Consignor Store Credit Group) to manage Payments to Consignors and Sellers, the Items Library can be exported for use in managing consigned and purchased inventory,specifically in:
- assessing current inventory levels and
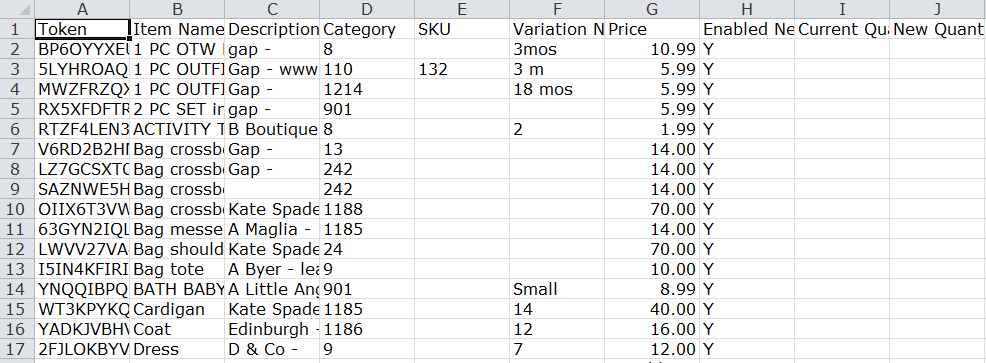
- identifying consigned items not sold within the consignment period and to be returned to the consignor or otherwise disposed of according to the Agreement. As shown below the spreadsheet exported from Square includes the ‘Item Name’, ‘Description'(including Brand), ‘Size’ (where applicable in the ‘Variation Name’ column, ‘Price’ and ‘Category #’/Customer Reference#. The spreadsheet exported from Square for Retail includes ‘Cost’ as well.
In Square Dashboard: [Items] The Item Library screen listing the inventory.
At the Top of the screen [All Categories] [All Inventory] should appear [Actions] > {Export Library] Select [Export to Excel] A spreadsheet like that shown below will appear.
Setup, Training & Support
NextGen provides consultation and assistance in setting up the Buying and Pricing Portal to user specifications, and in configuring Square or Square for Retail POS for managing sales, payments and inventory for items both purchased and consigned using the Portal. NextGen also provides remote training and on-call support on:
- the use of the NextGen Buying and Pricing Portal to enter, change and export information on items purchased or accepted on consignment from customers, and on customers themselves.
NextGen also provides remote consultation on how to:
- how to configure the Square Point of Sale System to manage resale operations,
- how to import Customer and Item information from the NextGen Export files into Square for purposes of managing resale customers, inventory and sales,
- how to import Item information into Dymo for the purpose of printing labels.
How-to and technical support pertaining the the use of Square and Dymo generally is provided directly by Square and Dymo.
NextGen on-call support is available during normal business hours (M-F, 9:00 AM-6:00 PM, EST). Call 855 696-3984 Ext 720.
Support via Email (support@nextgenresale.com) (or Text (781-704-6444) is available 7 days a week.

